-->

Tuesday, December 22, 2015

Setting IST timezone on Amazon Ec2 instance

For setting the IST Timezone on the Ec2 instance


1. vi /etc/sysconfig/clock

ZONE="Asia/Kolkata"
UTC=false

2. sudo mv /etc/localtime /etc/localtime_old

3. sudo ln -s /usr/share/zoneinfo/Asia/Kolkata /etc/localtime

4. sudo reboot

Restart is necessary for all the services to take the updated timezone.


Monday, November 30, 2015

Removing a file in S3 with space in bucket name

If you have created a file in S3 with Name which is having a space than you won't be able to delete it from aws console. Also due to the space it won't take the complete name and will give 404 i.e. object not found error.

For e.g Removing a file name s3://bucket/Demo Demo won't work

You can remove it from the Command line as follows

 aws s3 rm s3://bucket/Demo\ Demo/  

Friday, November 27, 2015

Verifying all running instance types in Amazon AWS

If you have reserved your instances , than you should track which all instances are running in your environment. Like if you have reserved m4.large instance so you are always billed for them whether you spawn it up or not you are charged for it.

So if you suppose reserved 5 instances of m4.large than you should make sure that 5 instances of m4.large is running at all times. But this can be difficult from checking this information from the console , you can grep all the m4.large instances from the AWS CLI.

Use the following command to see all the instance types running in your environment.

 aws ec2 describe-instances | grep InstanceType | cut -d "\"" -f4 | sort | uniq -c  


Monday, November 16, 2015

Script for checking database connections and queries taking maximum time

If you want to monitor the database connections , you can use this script. The script checks for the  connections count every minute and sends an email whenever the connections crosses the specified threshold. Same can be done via some monitoring tool(Nagios) also.

But you can customise the script to check the queries running at the time your database connections were high. This will help you to find the rogue query which might be causing the issue and will present you the better results for the troubleshooting the problem.

 #!/bin/bash  
 date=`date`  
 #####check the number of connections established  
 mysql --user="db_user" --password='db_password' --host="rds-name.ap-southeast-1.rds.amazonaws.com" --execute="show status like 'Threads_connected'" > /tmp/db.log;  
 conn_count=`cat /tmp/db.log | grep -i threads | awk '{print $2}'`  
 #####Compare the established connections with the threshold in our case its 1500  
 if [ $conn_count -gt 1500 ]  
 then  
 #### Create a file with all the queries running at that time  
 mysql --user="db_user" --password='db_password' --host="rds-name.ap-southeast-1.rds.amazonaws.com" --execute="show full processlist \G" > /tmp/dbquery.txt  
 #### Create a file isolating the queries only in descending order of there execution time with the query taking most time to execute coming first  
 mysql --user="db_user" --password='db_password' --host="rds-name.ap-southeast-1.rds.amazonaws.com" --execute="show full processlist \G" | grep -v "row" | grep -v Id | grep -v User | grep -v Host | grep -v db | grep -v Command | sed 's/  Info://g' | sed 's/  Time://g' | sed 'N;s/\n/ /' | grep -v NULL > /tmp/maxtime-db-query.txt  
 #### Sent an Alert mail with connection count and attaching the Queries with the mail for troubleshooting and establing root cause  
 echo "High DB connections($conn_count) on Database_name at $date, DB Queries attached " | /bin/mail -v -s "Alert: High DB connections" -a /tmp/dbquery.txt -a /tmp/maxtime-db-query.txt [email protected]  
 fi  
 #### Remove all the temporary files generated during the script execution  
 rm -rf /tmp/db.log  
 rm -rf /tmp/dbquery.txt  
 rm -rf /tmp/maxtime-db-query.txt  

Tuesday, November 10, 2015

Script to Detect Dos attacks on a Webserver

While DOS attacks are very common on the Webserver , its easy to block the ips causing the Dos attacks. But the trickier part is to detect the Dos attacks as they happen. This would cause your webservers to load if a significant attack occurs but if you move towards the cloud implementation and your environment is under the autoscaling chances are new servers would get attached and absorb that attack. But this would significantly increase up your cost.

Whether you are running your environment in cloud , VMs or physical machine its always good to automate the detection of the Dos attacks as soon as it occurs. We are going to create a Bash Script to detect the DOS attacks as it happens.

Monday, August 24, 2015

Script to Monitor the Website Availability

With Bash scripting you can monitor the Availability of a Website in your environment.

In order to achieve this without any third party monitoring tool you can simply create a script which can check the URL status code and if that changes it can simply send an email to you with the latest status code in the email body after which you can troubleshoot the same.

Saturday, May 2, 2015

Creating a Repository and committing the changes

In git you would need to initialize a Repository first which would be empty at the start point.

We are going to create a test directory and initialize the directory as our git Repository

~ $ mkdir test
~ $ cd test/
~/test $ git init
Initialized empty Git repository in /root/test/.git/

Initializing a directory creates a subdirectory of .git which includes files used by git to track the changes

~/test $ cd .git/
~/test/.git $ ll
total 32
drwxr-xr-x. 2 root root 4096 May  1 20:11 branches
-rw-r--r--. 1 root root   92 May  1 20:11 config
-rw-r--r--. 1 root root   73 May  1 20:11 description
-rw-r--r--. 1 root root   23 May  1 20:11 HEAD
drwxr-xr-x. 2 root root 4096 May  1 20:11 hooks
drwxr-xr-x. 2 root root 4096 May  1 20:11 info
drwxr-xr-x. 4 root root 4096 May  1 20:11 objects
drwxr-xr-x. 4 root root 4096 May  1 20:11 refs

If we are going to check in the test directory , the git will show there is nothing to commit

~/test $ git status
# On branch master
#
# Initial commit
#
nothing to commit (create/copy files and use "git add" to track)

So we are going to create an test.txt file
~/test $ echo "This is just my test file" > test.txt

Now if we are going to check the git status , it will treat this as untracked since its not been added to git yet

~/test $ git status
# On branch master
#
# Initial commit
#
# Untracked files:
#   (use "git add <file>..." to include in what will be committed)
#
#       test.txt
nothing added to commit but untracked files present (use "git add" to track)

Git Installation and Basic configuration

You can simply install git using the yum

# yum install git

It will resolve the dependencies for you mostly comprising of the perl which git actually uses and will install the git.

Next configure a global username and email id

~ $ git config --global user.name "Root User"
~ $ git config --global user.email "root@localhost"

This would actually create an .gitconfig file which will hold your details

~ $ ls -ltr .gitconfig
-rw-r--r--. 1 root root 49 May  1 17:35 .gitconfig
~ $ pwd
/root

~ $ cat .gitconfig
[user]
        name = Root User
        email = root@localhost

You may also list the details using the following command

~ $ git config --list
user.name=Root User
user.email=root@localhost

Git is designed to take the parameters locally and globally , so you may set additional parameters and can even set the same parameters to have different value both locally and globally

$ git config --system system.name "Git Repo Server 1"
$ git config --list
system.name=Git Repo Server 1
user.name=Root User
user.email=root@localhost

$ git config --global system.name "My Git Repo Server1"
$ git config --list
system.name=Git Repo Server 1
user.name=Root User
user.email=root@localhost
system.name=My Git Repo Server1

You can also set the editor in the git that you are going to use

~ $ git config --global core.editor vim
~ $ cat .gitconfig
[user]
        name = Root User
        email = root@localhost
[system]
        name = My Git Repo Server1
[core]
        editor = vim

It is also possible to define the page option in git whether it would be less or more. By default its less if nothing is specified you may use more

~ $ git config --global core.pager 'more'
~ $ git config --list
system.name=Git Repo Server 1
user.name=Root User
user.email=root@localhost
system.name=My Git Repo Server1
core.editor=vim
core.pager=more


Common Source Tasks in Git

Initialization:
Creating the Empty repository for use. Repository are much like the Linux Repos which contain all the source or version control files and directories. So it is necessary to initialize a Empty Repository where you can important all the stuffs and files into.

Clone:
Making a local full copy of a repository on your workstation. Where you can further work and create further branch or manipulate or add the functionality as per your requirement.

Checking out:
Locking a copy of one or more files for exclusive use. Though it is not mostly used , it was essentially used in the visualsource or perforce, it was done to make sure no one else can make changes which may either conflict or overwrite your changes. Checking out not commonly done today and there are other better way to achieve it.

Branching:
Allowing a set of files to be developed concurrently and at different speeds for different reasons.It allows to attain different functionality.

Merging:
Taking different Branches or set of changes and integrating into one set of branch.

Resolving:
Taking Conflicting changes from the multiple people on the same files and manually addressing those conflicts to achieve the Merging.

Commit:
Taking the Changes from the local system and commiting them to the Branch. You are going to clone the branch and will work on it and after the changes are done you need to commit the changes to merge them to the Branch you were working on.

Push/Pull:
Taking changes locally or remotedly and merging them into one or more branches.

Understanding Version Control and Available Version Control Softwares


What is Version control
It is a method used to keep a software system that can consist of many versions and configurations , well organized.

Why Version control
Usually through a period of the software development we might have various versions of software, code updates, hot fixes, bug fixes which all are revised over a period of time but we need to maintain the version and keep all the version intact so we might refrence them back over a period of time. Also in case of a problem with an updaded version of a software , we can always revert back to the older version easily using the version control software. All these things can easily be achieved using th version control software.

There are large number of version control softwares
1. CVS: Kind of origin of source control
2. PVCS: Commercialized CVS
3. Subversion: inspired by CVS
4. Perforce: It is a commercial, proprietary revision control system developed by Perforce Software, Inc.
5. Microsoft visual sourcesafe:- Microsoft solution but its not updated since 2005.
6. Mercurial:- Another famous version control and open source, (hg symbol) is quite often used.
7. Teamsite: microsoft solution for version control
8. Vault: usually marketted as a replacement for the Microsoft's Visual Source Safe.
9. Bitkeeper:- used to manage the Linux kernel before Linus Torvalds created Git.
10. Git:- Created by our favourite Linux Author and creator. Linus Torvalds

Monday, April 6, 2015

Creating an Ec2 instance for mediawiki installation

After creating the db instance for the mediawiki installation next we need to install and configure an EC2 instance for creating the webservers for our installation.

For our installation we are going to create an Ec2 instance and install the apache webservers along with php and mysql.so in order to connect to mysql rds we created initially. After that you don't need to create another instance and again repeat all the steps again. We are going to create an AMI of that instance and launch the instances from autoscaling group thus reducing our work overhead.

Follow the steps for building a ec2 instance for mediawiki installation.

1. Click Ec2 From the dashboard and under Ec2 dashboard select "launch Instance".
Launching Ec2 instance for mediawiki


2. We are going to install the RHEL7 for our installation. Select the appropriate ami
selecting rhel ami for mediawiki installation


Sunday, April 5, 2015

Launching an Ec2 instance in Amazon AWS

The Ec2 instances are the actual Unix operating systems that you would be running in your environment. Amazon AWS provides you with flexibility with customizing the instances according to your need from selecting the instance types to the images so you always not need to start from scratch and load the Unix systems from starting and instead you can create the images and boot them directly which would be exact replica that you created initially or might be you consider using the community images as well.

Follow the steps to create an Ec2 instance under the Default VPC

1. Select the Ec2 from the Dashboard and select launch an EC2 instance.


Attaching a Network Interface from one Ec2 instance to another in AWS

It is possible to detach a Network Instance from one Ec2 instance and attach it to another Ec2 instance. This provides you flexibility to scale up the instance or you may even assign multiple ips to an instance and later update those to more machines in future. Depending on your needs you can leverage the advantage of this in your infrastructure.

For our consideration , we launched an Ec2 instance in a vpc without any Public IP Address. So we are going to detach the Network Interface and attach it to this Instance. This would inturn assign the elastic ip address to this new instance.

Saturday, April 4, 2015

Assigning Multiple Network Interfaces to an EC2 instance


In our example we have created the instance with a public ip taken from the Amazon pool of ips at the time of the creation of the instance. We are going to attach a 2nd NIC card to our instance and an elastic ip address to the running instance. Final confirmation would be when we are able to connect to the same instance from the multiple public ip address.

1.Select EC2 in your dashboard and click on the Network interfaces.


2.Select “Create Network Interface” from the top.


Understanding Network Interface in AWS , usage and Advantages

Just like your normal virtual machines you need to attach an network interface card to your ec2 instances in AWS for making them available on internet. It also gives you flexibility to attach more than one NIC card to your instance. Depending on the kind of instance you running you can add network interface card to them.  Like you can attach upto 3 network interface card as of now to your micro instance in AWS.

Friday, April 3, 2015

Creating a VPC under Amazon AWS

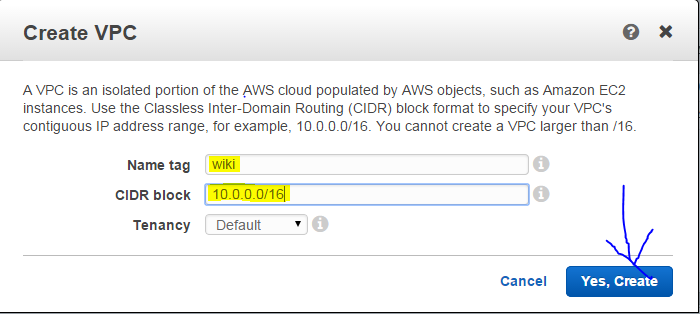
1. Creating  a VPC for the for the content management (Wikimedia) which can be used for the launching the of the Webservers as well as DB servers. Click on the VPC in the Dashboard and click the Create VPC.


2. Next you need to Tag your VPC and specify the CIDR (Classless-Inter Domain Routing) block range and Tenancy(default runs on shared hardware) there are also some limitations of dedicated Tenancy as EBS volumes will not run on single-tenant hardware.


Wednesday, April 1, 2015

Configuring High Availaibility RDS in AWS

 1. Click on the RDS on your AWS Console

2. Next go to subnet Groups under RDS Dashboard


3. You Will need to create the DB Subnet group which would be used by RDS to launch the DB instances in AWS


Monday, March 23, 2015

Shell Script to move files from one directory to another with a delay of 1minute

The following shell script provides a solution to move the files from the /opt/a directory to /opt/b directory with 100 files/min which means it will only move 100 files from the /opt/a directory which can have thousands of file than have a delay of 1min and than again after 1min it will further move  the 100 files till all the files in the directory /opt/a moves to other directory /opt/b

 #!/bin/bash  
 #Find all the files only in directory /opt/a and count the number of the files, starttime will display when the script start executing
 count=`find /opt/a/ -type f | wc -l`
 starttime=`date`
 echo "The script started at $starttime"
 #The condition is set till the file count is greater than 0 continue moving files and reduce the counter by 100  
 #A delay is introduce by sleep command
 while [ $count -gt 0 ]
 do
  find /opt/a/ -type f | head -100 | xargs mv -t /opt/b/
 /bin/sleep 60
 ((count= $count - 100))
 done
 echo "The script completed at `date`"
 exit 0

The practical application of this script can be configured if you don't want to increase the throughput on the server. Also it will keep a check on the network resources in case files are larger in size.

Monday, March 16, 2015

Managing Complexity of environment with CHEF

For understanding the concept of managing the complexity with chef you need to be aware about some terms as discussed in my earlier post Basics About Chef.

Considering the large number of webservers , database servers working under load balancer. Using caching technologies to optimize the serving time , monitoring the overall availability. Making the system scalable on the go all adds to the complexity but necessity to our Environment. It is necessary to understand the how chef deals with the complexity and how can achieve the desired state of your environment while managing this complexity.

Sunday, March 15, 2015

Basics About Chef

Chef is the configuration management tool written in ruby. Chef can be used to automate most of the infrastructure related operations and helps to achieve you the desired state of your infrastructure and act as an enforcer of the state so that your environment always remain in the state you configured.

Chef takes the infrastructure as an code and manages it accordingly. It can be used for managing cloud based environment, VM based environment as well as physical servers.

For understanding the chef , need to have understanding of the following terms:-

1. Resource:- A resource represent a piece of the system and its desired state. For e.g.


  • A package that should be installed
  • A service that should be running
  • A file that should be generated
  • A cron job that should be configured
  • A user that should be managed and more

Resources are the fundamental building blocks of the chef configurations. you identify the resources and there states. Achieving the desired states of the resources in all the  servers in an environment is our objective.

2. Recipe:- Recipes can be considered as the configuration files that describes your resources and their desired state. Depending on the kind of requirement a Recipe can perform various  functions

  • Install and configure software components.
  • Manage files
  • Deploy applications
  • Execute other recipes and more


3. Node :- The node are the servers in an environment. Depending on the kind of environment you can have one or many servers serving some particular functions. Like webservers behind a firewall. The chef-client runs on each node which can


  • Gather the current system configuration of the node
  • Download the desired system configuration policies from the chef server for that node
  • Configures the node such that it adhere to those policies.

4. Run list : The Run list comprises of the ordered collection of the policies which the node should follow. Chef-client obtains the run list from thee chef server and ensures the node complies with the policy in the run-list.

This helps in achieving the policy enforcement and helps to keep the infrastructure nodes in sync.

5. Search:- Search is a unique function in the chef and can be used to search the nodes with the roles and find the topology data. Using search you can find the ip-address, hostnames, FQDNS etc. Consider a situation where you need to add all the webservers under your load balancer. Instead of describing each webserver ip individually you can get it from search. Now when you configure autoscaling or building the infrastructure in cloud this can be automated using the search function. You can also add node on the go while autoscaling using the search function.

Saturday, March 14, 2015

Setting Authentication for Apache

The apache allows us to set the authentication for the specific domains so that only the authorized users are able to see the content. This can particularly be helpful in case you have not launched your domain to the public or it is in development phase. In such an scenario you want to restrict only the domain to be accessible to your development team. This can be achieved using the Apache Authentication.

There are two files you required for setting up the Apache Authentication i.e. .htaccess and .htpasswd

The .htaccess file is a simple text file placed in the directory on which the apache authentication needs to be set up. The rules and configuration directives in the .htaccess file will be enforced on whatever directory it is in and all sub-directories as well. In order to password protect content, there are a few directives we must become familiar with. One of these directives in the .htaccess file ( the AuthUserFile directive ) tells the Apache web server where to look to find the username/password pairs.

The .htpasswd file is the second part of the affair. The .htpasswd file is also a simple text file. Instead of directives, the .htpasswd file contains username/password pairs. The password will be stored in encrypted form and the username will be in plaintext.

So .htaccess is the file where you will define the condition for the authentication, whenever the request will come to webserver the AuthUserFile directive tell apache where to look for the authentication details and .htpasswd is the actual file which stores your username and password in encrypted form.

Granting User access to the Apache server
1. Login to the requested server
2. Navigate to the following directory /var/www/<>
3. Locate the requested user in the /var/www/<>/.htpasswd.user file
user will be present in the file, if already exist
4. If user is not present in the file, use the below command to add.
/usr/local/apache2/bin/htpasswd /var/www/<>/.htpasswd.user
5. The above command will create the user “” in the /var/www/<>/.htpasswd.user file.
6. Verify the entry in the htpasswd.user file


In the .htaccess files you need to enter the below parameters.


 AuthType Basic  
 AuthName "Restricted Access"  
  AuthUserFile /var/www/webroot/.passwd  
  Require user ; 

This would restrict the users and would require a user to authenticate using the credentials to view the webpage.

You can further optimize this by setting up the passwordless access to the user within your organization , so if the user is trying to access this within your organization network he would direct access to the webpage or domain without the need to authenticating i.e. it would make it passwordless when access from the organization network.

You can add following parameters either to .htaccess file or to apache configuration file,

 AllowOverride All  
 Order Deny,Allow   
  Deny from all  
  Allow from 62.209.198.0/24  
  Allow from 62.209.195.0/24  
  Allow from 68.76.88.0/24  
  Allow from 218.176.96.0/24  
  Allow from 208.211.16.0/24    
  Allow from 127.0.0.1  
  AuthType Basic  
  AuthName "Restricted Access"  
  AuthUserFile /var/www/webroot/.passwd  
  Require user username  
  Satisfy Any  

Restart the apache gracefully .

Note: When you are adding the users to the same file don't use the "c" option. it should be used only the first time when you are creating the .passwd file .
If you use -c option , it will rewrite and truncate the passwd file which is created earlier. There are chances user will be present in the file, if it already exist .

Setting Authentication with Apache

The apache allows us to set the authentication for the specific domains so that only the authorized users are able to see the content. This can particularly be helpful in case you have not launched your domain to the public or it is in development phase. In such an scenario you want to restrict only the domain to be accessible to your development team. This can be achieved using the Apache Authentication.

There are two files you required for setting up the Apache Authentication i.e. .htaccess and .htpasswd

The .htaccess file is a simple text file placed in the directory on which the apache authentication needs to be set up. The rules and configuration directives in the .htaccess file will be enforced on whatever directory it is in and all sub-directories as well. In order to password protect content, there are a few directives we must become familiar with. One of these directives in the .htaccess file ( the AuthUserFile directive ) tells the Apache web server where to look to find the username/password pairs.

The .htpasswd file is the second part of the affair. The .htpasswd file is also a simple text file. Instead of directives, the .htpasswd file contains username/password pairs. The password will be stored in encrypted form and the username will be in plaintext.

So .htaccess is the file where you will define the condition for the authentication, whenever the request will come to webserver the AuthUserFile directive tell apache where to look for the authentication details and .htpasswd is the actual file which stores your username and password in encrypted form.

Granting User access to the Apache server
1. Login to the requested server
2. Navigate to the following directory /var/www/<>
3. Locate the requested user in the /var/www/<>/.htpasswd.user file
user will be present in the file, if already exist
4. If user is not present in the file, use the below command to add.
/usr/local/apache2/bin/htpasswd /var/www/<>/.htpasswd.user
5. The above command will create the user “” in the /var/www/<>/.htpasswd.user file.
6. Verify the entry in the htpasswd.user file


In the .htaccess files you need to enter the below parameters.


 AuthType Basic  
 AuthName "Restricted Access"  
  AuthUserFile /var/www/webroot/.passwd  
  Require user ; 

This would restrict the users and would require a user to authenticate using the credentials to view the webpage.

You can further optimize this by setting up the passwordless access to the user within your organization , so if the user is trying to access this within your organization network he would direct access to the webpage or domain without the need to authenticating i.e. it would make it passwordless when access from the organization network.

You can add following parameters either to .htaccess file or to apache configuration file,


 AllowOverride All  
 Order Deny,Allow   
  Deny from all  
  Allow from 62.209.198.0/24  
  Allow from 62.209.195.0/24  
  Allow from 68.76.88.0/24  
  Allow from 218.176.96.0/24  
  Allow from 208.211.16.0/24    
  Allow from 127.0.0.1  
  AuthType Basic  
  AuthName "Restricted Access"  
  AuthUserFile /var/www/webroot/.passwd  
  Require user username  
  Satisfy Any  

Restart the apache gracefully .

Note: When you are adding the users to the same file don't use the "c" option. it should be used only the first time when you are creating the .passwd file .
If you use -c option , it will rewrite and truncate the passwd file which is created earlier. There are chances user will be present in the file, if it already exist .

Adding and Compiling a new module in Apache Web Server

The following steps are required for adding up a new module (DSO) to the Apache Web Server:

If you have your own module, you can add it to the "httpd.conf" file, so that it is compiled in and loaded as a DSO (Dynamic Shared Objects).

For the successful compilation of the shared module, please check the installation of the "apache-devel" package because it installs the include files, the header files and the Apache eXtenSion (APXS) support tools.

APXS uses LoadModule directive from the mod_so module.

Steps to Proceed:
1. Download the required module tarball from the internet using wget command to the /tmp directory of the server.

2. Untar the tarball: cd into that directory and issue the following commands :

$ /path/to/apxs -c mod_foo.c
$ /path/to/apxs -i -a -n foo mod_foo.so


-c = It indicates the compilation operation. It first compiles the C source files (.c) of files into the corresponding object files (.o) and then builds a dynamically shared objects by linking these objects files to remaining object files.

-i = It indicates the installation operation and installs one or more dynamically shared objects into the server's modules directory.

-a = It activates the module by automatically adding a corresponding LoadModule line to Apache's httpd.conf configuration file, or by enabling it if it already exists

-n= It explicitly sets the module name for the -i (install) and -g (template generation) option. Use this to explicitly specify the module name

Then edit the "httpd.conf" file and add the following lines in the respective sections for loading the module whenever Apache restart.

(taking example of compiled module mod_foo)

LoadModule mod_foo modules/mod_foo.so

AddModule mod_foo.c

Once this is done, we need to restart the Apache Web Server.

Sunday, March 8, 2015

Blocking an IP from Apache

There are scenarios when you need to block some specific ip which might be causing issues in your webservers . If you are sure the ip which is requesting the resources is not genuine and seems suspicious than it can be directly blocked on the Apache end itself. This can be done for the specific domains in case you having shared hosting

The best way to do this is via a .htaccess file from the Docroot of the domain which can be confirmed from the configuration file


Follow the steps to achieve this.

 cd /var/www/document-root-of-domain  
  vi .htaccess

 order allow,deny  
 deny from IP Address  
 allow from all

Save and quit . That's it the ip is blocked now. If you are having multiple webservers behind the load balancer than you should consider updating the same on all the webservers in order to fully block the ip from accessing anything on your webservers.

After you have updated the rule it should show the 403 forbidden response to the resource request in the log file which confirms that it have successfully been blocked. You would continue seeing the request in log file but it would not affect anything as it is simply denoting the request are coming repeatedly but its is forbidden to access any resource on your webserver.

Friday, March 6, 2015

EBS (Elastic Block Store) Imporatnt Points and Snapshots

EBS Storage:-

Here are some important points to consider for the EBS Storage. Consider previous post for more information on EBS.

1. Block level storage device.
2. Additional network attached storage.
3. Attached to only a single instance.
4. At least 1GB in size and at  most 1TB.
5. Each EC2 instance is backed by an EBS volume.
6. EBS RAID 0 for redundancy
Pre-Warm EBS Volumes
* EBS erases on first mount which causes loss of 5 to 50% OPS first time

Snapshots
1. Incremental Snapshots
2. Frequent snapshots increase durability
3. Degrade application performance while being taken.

IOPS in AWS

IOPS (Input/Output operations per second)

It is important to understand the concept of the IOPS in the AWS environment.

It is measured in the 16KB chunks

You can calculate the provision IOPS by this formula

IOPS x 16kb / 1024 = MB tranfer per second

you can use the command iostat or sar in Linux to find the iops operation on Linux System.

The major application of iops come with the database operations.

As database can perform very high IOPS.

You can use the provision iops for getting the higher IOPS in EBS.

you can have 200 to 4000 provisioned IOPS, from the above formula we can calculate what the transfer per second is between the EBS and the instance.

Storage on the Amazon AWS

Storage on the Amazon AWS:

1. S3 (Simple Storage service)
S3 is an object type storage and can be considered as an FTP server where you can simply keep your text files, image files, video files etc. It provides maximum uptime and is a cheap type of storage service. You can also make objects public/private and can share over the network. You can also host static websites directly from the S3. By default your snapshots are directly stored into the S3. It is a permanent storage solution and also supports versioning which needs to be enabled. you can store infinite data into the S3 only limitation is that you can't upload a single file bigger than 5TB in size.


Types of Instances and the major differences between the instances

Instance Types
There are very large number of instances availaible from the AWS and depending on your compute requirement you want to use the same. But here is general categorization of the instances.

Micro
Small
Medium 
Large

We could use very large instance types which can cost very high but when you are running them on hourly charge you are actually paying less. For e.g. If you spin up quadraple extra large instance for an hour and spend like $2. Rather than purchasing whole bunch of harware and running in your datacenter.


About EC2 and purchase options in EC2

EC2 (Elastic Cloud Compute):
Can host the Unix and Windows based operating system.

Since its running inside the cloud environment no need of purchasing any server or software.

We are going to focus on Linux Instances.

Purchase options for EC2:

1. Spot Instances:Bid on usused EC2 instances and can be bought in at lower price than the normal instance price options. But tradeoff here is they are not guaranteed compute time and amazon can take back the instance anytime it requires it. So it is only suitable for the batch processeses.

2. Reserved Instances: It allows to purchase and pay initially at lower price for annually and is best suited when you are confirm that you will be running the server for a definite period like 24 x 7. We purchase instance in a specific in a specific availaibility zone. Purchasing Instances help us to pay lower price/hour for annual cost or 3 years cost and also guarantee us the availaibility and access to the instances. If  that availaibility zone goes down and your instances spin up from different availaibility zone than as you have guaranteed access so you will have priority over the on demand instances and instances will be first allocated to you since you have reserved them initially.


Thursday, March 5, 2015

Weighted Routing policy in Route 53 AWS

The Route 53 can configure your DNS based on the Weighted Routed policy for smoother migration from your on premise datacenter to the AWS. It can also be used to smoother migration from one region to other. Also you can avail it for any migrations by configuring it to work for your requirements.

Weighted Routing policy: To understand the concept , consider you are migrating from your on premise to the AWS hosted environment. Now if your application is business critical you don't really want the things to break no matter how much testing you have done in your non-prod environments. The weight based migrations can help you to reduce it.

For migration you would be having multiple LBs or servers configured. So you can add multiple DNS records for you application for the same domain and you attach a weight to your DNS record. For starting you can deploy the weight as 10% for AWS and 90% to your on premise data center and as you track the performance and availability you can keep on increasing the allotted weight in your DNS until it has fully migrated and become 100% for the AWS. It works on simple principle that rather than getting 100% customer to face dissatisfaction or down time its better to start with 10% or less depending on your needs. This can additionally make your transitions smoother from one enviornment to another environment.


Configuring Route based Routing in AWS Route 53

If you want to increase the response time for your web applications , it is necessary to serve the content to the nearest location. Lets consider a situation where your datacenter are located in the singapore, with singapore being the primary region. If a user based in US will try and access contents of your application which is based in singapore region than he will have some delay due to the location difference. So if you want to further optimize the response time and wants that your content if accessed from the US region should be delivered from your US datacenter this can achieved through the Route based routing supported by the AWS route 53.

The similar concept is being used by the various CDNs available with a difference that your content is in cached form and served from the nearest edge location to the user.

Configuring the Automatic DNS failover in Amazon AWS for high Availaibility

For Critical applications high availability you can configure Automatic DNS failover in Amazon AWS. The DNS failover is fully automatic and runs as the healtchcheck fail is confirmed.

You can perform the failover to an static website hosted in S3 , or an on premise environment , or you can failover to other web instance hosted in some other region.

We would be running an instance in the singapore region as our primary DNS and will be configuring the failover in the US region. So as the healtcheck failure is configured the Route 53 will automatically failover the DNS to the secondary DNS in the US-east region. You can choose any region as you like. Further as soon as the healthcheck fail is recovered the DNS would again recover to the primary DNS in the singapore region. This is primarily used in setting up the DR environment and can help to increase the uptime in your environment.

Sunday, January 11, 2015

Adding a new module in Apache Server

Adding and Compiling a new module in Apache Server


The following steps are required for adding up a new module (DSO) to the Apache Web Server:
If you have your own module, you can add it to the "httpd.conf" file, so that it is compiled in and loaded as a DSO (Dynamic Shared Objects).
For the successful compilation of the shared module, please check the installation of the "apache-devel" package because it installs the include files, the header files and the Apache eXtenSion (APXS) support tools.

Configuring Apache to auto-start on Reboot

For configuring Apache service to autostart in case of a server restart follow the steps below:-


#chkconfig --list httpd
#chkconfig --add httpd
#chkconfig --list httpd
output:-
httpd             0:off 1:off 2:off 3:off 4:off 5:off 6:off
#chkconfig httpd on
#chkconfig --list httpd
output:-
httpd             0:off 1:off 2:on  3:on  4:on  5:on  6:off

Setting GID in Linux

For Setting up of GID on the directory in Linux use following command:-

find . -type d -exec chmod 2775 {} \;

. :- directory under which you want to set the GID
-type d :- specifies the type i.e. to find only directory
-type f :- specifies the type i.e. to find only files